I'm sure you've noticed I haven't been around (or maybe you haven't....my blog traffic is in the toilet this week). We lost my grandmother to Alzheimer's this week. Well, actually, we lost her to Alzheimer's in a sometimes slow and sometimes fast progression of symptoms over the last few years. It's an awful disease that steals first your judgment, then your memories, your daily life capabilities, and finally your physical functioning. It's difficult to explain to your 6 year old that has seen first hand what the disease does that we don't know what causes it and we don't have a way to fix it. Since she was perfectly healthy otherwise, we watched her succumb to every step of the Alzheimer's itself. My mother was her caretaker. She treated her with honor, with respect, and she did everything she could possibly think of to love her and comfort her right through the very end.
We drove the 2,000 miles here from Montana in the hopes of telling her we loved her one more time, but the end went too fast and we didn't make it in time. I'm sure somewhere behind the tangling brain plaques, she knew though.
I'll probably be back to blogging by the end of next week. I still have things from last week I've partially written and just haven't posted yet, and there will be quilt updates (I brought both quilts with me and just hand quilt both), not to mention "homeschooling on the go" posts. First, we have to figure out where we're going to be staying for the next 3 months or so and get all of that set up.


Saturday, August 28, 2010
Wednesday, August 25, 2010
Hiatus
I'm taking a short hiatus while I travel back to Texas (because there was a death in the family and because I was already planning to go there to have the baby anyway). I do have a few half-written posts I might get up by the end of the week, so check back soon.
Sunday, August 22, 2010
Day In The Life Week
 It's Day In The Life Week on the Not-Back-To-School Blog Hop. This post is a little bit difficult for me to write because we're still working on finding out what will work best for us. We started out slow, only doing one or two subjects a day and have been adding in things as we go. I think that was one of the benefits of starting "early"--I don't feel like we're falling behind if we skip a day here, or put off a subject there. It's also hard for me to write because my favorite thing about homeschooling so far is the lack of schedule. I guess it's left over from my angst-ridden, "I want to be grown up and make the rules" youth, but I just can't fathom having my entire family beholden to a schedule created by someone else. Sure, we kind of do that with jobs, but we have the freedom to choose whether we are going to take a certain job or not and whether the scheduling and duties of a particular job are worth the money that it pays. But with the public schools, there's not really any choice in the matter and the buses start picking up at 7:10 (and if my research is correct, ALL students from K through 12 ride the same buses and some elementary kids even get dropped at one elementary school, then picked up by another bus and shuttled to a different elementary school...no thank you).
 With all that said, we don't have a set time for everything and certainly not a schedule broken down by subject, but my kids (all kids?) do like routine, so we try to keep things pretty consistent. As I mentioned last week, I am not a morning person on the best of days and pregnancy doesn't help. I don't think my kids want to deal with me and my limited patience first thing in the morning either, so we get a slow start. They eat breakfast with daddy and then play by themselves while I get up, eat, check email and read a blog or two. I try to head up stairs for school time no later than 10am. I give Sierra her worksheets for the day to do independently and I sit down with Sedona to work on her things (typically phonics and her speech practice). When they are both done with those tasks, we switch. Sedona gets "worksheets" (which actually work on concepts like same/different and writing, but half the time she just grabs the box of crayons and colors all over them...whatever, she's 3), and I sit down with Sierra to go over things she missed and work on her math (which she almost always needs one-on-one attention for). We usually work until around noon, when daddy comes home for lunch. They show off their work to him and then we all sit down to eat. Right after lunch is nap-time for Sedona. Sierra and I sit down together and I read her a chapter out of a difficult book (we always start by talking about what we read the day before, then at the end, we review what we read that day). If we're behind on something else, we will do it then, but usually the rest of nap-time is quiet time for Sierra. She can read a book, watch a movie or play a game on her DS (she likes Big Brain Academy and Learn Math). Sometimes I even convince her to take a nap too. I sit down and rest, or catch up on chores. After daddy comes home and we eat dinner, sometimes all four of us will go back up stairs and do more school work if there is more to do or if the kids are driving us crazy to "go work" (yes, sometimes they out and out beg to do more schoolwork!). We will trade off which parents works with which kid, but they both get one-on-one time when we work in the evenings. Bedtime around here is 7:30 because we've tried later bedtimes and we get the same early wake up times regardless of bedtime, so they really don't get enough sleep if we let them stay up later.
The only thing different about speech therapy days is that Sierra's independent work is done at therapy. I explain any instructions I think might be confusing for her, pack the worksheets in a folder along with a pencil and any other supplies she might need, and she works by herself while I sit with Sedona during the therapy session.
I'd say there are a few planning things I've already had to re-think just in these early weeks. First of all, I was so concerned about getting the perfect curriculum (like most first time homeschoolers, I think), but I really should have been much more concerned with coming up with a viable plan to keep everyone happy. It has taken some trial and error to figure out how to get both kids to do something (even if it's "just" playing for Sedona) independently so I can work with the other one without ten million interruptions when I need to. I also knew I would need to do some prep work outside of our "school time", but I didn't really know how much. It's not overwhelming, but it can be time consuming. We still haven't started Spanish because I haven't previewed what the lessons are going to be like and gotten the materials set up yet. Same thing with history, I have ideas, but because of my lack of preparation, we haven't consistently added it to our schedule yet. We do have spelling, grammar, reading, geography, science and math in the regular rotation though, my goal is to get Spanish and history in there before the first of September!
Saving Summer
The time has come for us to spend a little time preserving a piece of summer. Peaches have been 78 cents per pound (as cheap as I think they'll get around here) at the grocery store and a local farmer has been selling fresh picked cherries for $2 per pound at the farmer's market.
We started out by making a few batches of peach leather:
Peaches washed and ready for processing To peel the peaches, we first cut an "x" on the bottom of the peach, then put them in boiling water for a short while (this depends on the peach, but somewhere from 30 seconds to a minute--the skin splits at the "x" when it's ready)
 They go straight from the boiling water into an ice water bath to cool them down quickly so they don't cook
  Ideally, the skin peels right off. If the peaches aren't quite ripe enough, the skin won't come off as easily. (Yes, that is baby #3 already getting involved in the food preservation).
 After carefully cutting around the circumference of the peach (peeled peaches are slippery), you can separate the halves, and cut whichever half has the pit in half again to get the pit out
 Our peaches all diced up
 We ran them through the food processor to make a puree and in the last batch we ran through, we also added lemon juice (2 tsp per 2 cups of peaches) and honey (just to taste, I think we did about 1/4 cup per 2 cups of peaches)
 Next, we put the puree in the dehydrator. In the past, we've just lined the trays with saran wrap for this step. It worked, but since it was impossible to pour a thick layer, the edges of our fruit leather would be dry and crispy. When we moved here, we quickly realized that food preservation is much more common in this area than it was in our old town. In addition to crates full of canning jars and replacement parts for pressure canners and anything else you could think of, the local hardware store also sells the fruit leather trays for the dehydrator. These are inserts that sit on top of the regular trays and give you a perfect surface for pouring a nice, uniform layer of fruit puree. For our dehydrator, each tray holds 2 cups of puree. The only "trick" is that the instructions for the tray recommend spraying it with non-stick spray before pouring on the fruit puree. We forgot the spray on the first tray and I can tell you it is definitely easier to peel the dried leather off if you use the spray.
 We only have 4 trays and we got 8 cups of puree before we ran out of peeled and diced peaches, so the left over peaches had a quick soak in lemon juice (1 part lemon juice to 4 parts water, to help them retain their color) and got thrown on another tray
 We set the dehydrator at 140 degrees (highly recommend a dehydrator with variable temperature settings if you're looking to buy one) and the next morning, we had peach leather!
 It's easier to package up while it's still warm, so I took one tray at a time, peeled the leather off the tray in one big sheet, then cut it into pieces before it could cool down. You could put your pieces on wax paper and roll them up while they're still warm, but we decided to just stack them and put them in a ziploc bag
  The result is a fruit leather without high fructose corn syrup, chemical preservatives or an expensive price tag (approximately $4 of peaches, plus 1/8 cup of lemon juice, plus 1 cup of honey--we got our's for free as a "welcome to town" gift from a local store--got us 32 fruit leathers). I couldn't buy an equivalent leather for much less than 50 cents each. The girls absolutely love it and think of it as a dessert.
Since these pictures were taken, we've made another 4 trays of peach leather and we have plans today to preserve more peaches and some cherries.
We started out by making a few batches of peach leather:
Peaches washed and ready for processing
 To peel the peaches, we first cut an "x" on the bottom of the peach, then put them in boiling water for a short while (this depends on the peach, but somewhere from 30 seconds to a minute--the skin splits at the "x" when it's ready)
 They go straight from the boiling water into an ice water bath to cool them down quickly so they don't cook
  Ideally, the skin peels right off. If the peaches aren't quite ripe enough, the skin won't come off as easily. (Yes, that is baby #3 already getting involved in the food preservation).
 After carefully cutting around the circumference of the peach (peeled peaches are slippery), you can separate the halves, and cut whichever half has the pit in half again to get the pit out
 Our peaches all diced up
 We ran them through the food processor to make a puree and in the last batch we ran through, we also added lemon juice (2 tsp per 2 cups of peaches) and honey (just to taste, I think we did about 1/4 cup per 2 cups of peaches)
 Next, we put the puree in the dehydrator. In the past, we've just lined the trays with saran wrap for this step. It worked, but since it was impossible to pour a thick layer, the edges of our fruit leather would be dry and crispy. When we moved here, we quickly realized that food preservation is much more common in this area than it was in our old town. In addition to crates full of canning jars and replacement parts for pressure canners and anything else you could think of, the local hardware store also sells the fruit leather trays for the dehydrator. These are inserts that sit on top of the regular trays and give you a perfect surface for pouring a nice, uniform layer of fruit puree. For our dehydrator, each tray holds 2 cups of puree. The only "trick" is that the instructions for the tray recommend spraying it with non-stick spray before pouring on the fruit puree. We forgot the spray on the first tray and I can tell you it is definitely easier to peel the dried leather off if you use the spray.
 We only have 4 trays and we got 8 cups of puree before we ran out of peeled and diced peaches, so the left over peaches had a quick soak in lemon juice (1 part lemon juice to 4 parts water, to help them retain their color) and got thrown on another tray
 We set the dehydrator at 140 degrees (highly recommend a dehydrator with variable temperature settings if you're looking to buy one) and the next morning, we had peach leather!
 It's easier to package up while it's still warm, so I took one tray at a time, peeled the leather off the tray in one big sheet, then cut it into pieces before it could cool down. You could put your pieces on wax paper and roll them up while they're still warm, but we decided to just stack them and put them in a ziploc bag
  The result is a fruit leather without high fructose corn syrup, chemical preservatives or an expensive price tag (approximately $4 of peaches, plus 1/8 cup of lemon juice, plus 1 cup of honey--we got our's for free as a "welcome to town" gift from a local store--got us 32 fruit leathers). I couldn't buy an equivalent leather for much less than 50 cents each. The girls absolutely love it and think of it as a dessert.
Since these pictures were taken, we've made another 4 trays of peach leather and we have plans today to preserve more peaches and some cherries.
Saturday, August 21, 2010
Quilt Step Seven: Hand Quilting
Disclaimer: I am in no way a quilting expert. I have learned solely from trial and error (emphasis on error) and reading on the internet. I have only made 4 quilt tops and have hand quilted 1 top and machine quilted 4 tops. I am not saying everything I do is the right way to do it, just sharing what I've picked up so far. You'll probably learn best by trial and error too ;-)
Now that I have my quilt sandwich assembled, it's time for me to quilt this (seemingly bigger each day) quilt. This is only the second time I've hand quilted anything, but it's already much easier this time around and I can tell my stitches are getting a lot better.
The first thing I had to do was decide what pattern I wanted to quilt. I wanted to keep it simple and relatively sparse both so it would go quickly and so I could avoid as many seam allowances as possible (it's a lot harder to quilt wherever there's a seam allowance because you have extra thicknesses of fabric). For the quilt batting I'm using, the packaging informs me that the ideal quilting distance is 2-4 inches apart, so I thought about what I wanted to do and then made sure that design wouldn't be too spaced out.
I also needed to get all of my stuff together. I use Gutermann quilting thread for hand quilting, and quilting needles (also called "betweens"). I keep scissors close by along with a thimble (though I don't use it the whole time...they drive me crazy) and one of those rubber grips used to help open jars to help me grip the needle if I need to pull it through a thicker section. The last thing I have on hand is some sort of tape that won't leave sticky residue on the fabric.
Then, it was time to quilt. As always, start in the center and work your way out. Here is my center square with the hoop already on the quilt (making sure the backing fabric didn't have wrinkles in it). The pink threads you see are the basting lines I put in to hold everything together temporarily (I will just cut those out when I'm done quilting), the white threads are my quilting lines. I chose white because it matches both the top and the bottom of the quilt. My technique's not quite good enough to make the quilting part of the quilt design yet--I just want it to blend in. One thing about quilting that was always a mystery to me was how to do the quilting without have all of the thread knots hanging out. My sister-in-law explained it to me in an email and with my mom's help, I finally figured out the technique. You start out by tying the knot in the end of your thread.
  Then you put the needle only through the top layer of the quilt just a short distance away from where you want to start and push the end of the needle up through the place you really want to start.
  Pull the thread until the knot pulls through the first hole, but not the second one.
 Now you're ready for the quilting stitches. Hold the needle in your dominant hand with your other hand under the quilt. With the needle vertical, push it through all layers of fabric until you barely feel the point on the bottom side
 then rock the needle over horizontal to the fabric and push it through.
 Most people use a thimble on the finger that they use to push the needle. Thimbles drive me batty though, so I only use one if I'm pushing through a seam allowance (which is hard to do). Otherwise, I tend to just push the needle with my fingernail. This wouldn't work if I was quilting for hours at time (it would get to be too much stress on my nail and start to hurt), but I like frequent breaks anyway, so it usually works fine.
Pull the thread through and voila! (random pet-peeve of mine..."wah-la" is not a word) your first quilting stitch. I still do my stitches separately, but you can keep up this process (when you rock the needle to the side, turn it back vertical as soon as the point comes through the top and do another stitch) so you get several done at once. You'll also notice my oh so lovely princess tape. I think I've briefly mentioned this trick that I saw my sister-in-law using, it just gives you a guide for making a straight line of stitches. Medical tapes work well because they don't leave the fabric sticky. The last time we bought tape was to bandage up a crushed finger injury of Sierra's (note to all the kiddies out there...sticking your fingers in the hinge side of an open door is a BAD idea), so what I have is princess themed.
At the end of your line of stitches (or the end of your thread, whichever comes first), you will also need to hide an ending knot. Make sure you stop when there's still enough thread left to tie it off. Wrap your thread around the needle then pull the needle through to make a knot.
  Just like when you started, stick the needle through the top part of the quilt only and push the point back up a short distance from where you're stopping.
  Pull until your knot is pulled through the fabric
 then cut off the thread close to the fabric.
The design I ended up choosing (actually, Josh came up with it because I was having trouble coming up with something I was happy with) looks like this on all of the white sashing strips plus I'm doing an "x" in all of the center squares. Right now I have 4 squares done, only 109 to go...yay.
I also got the batting for the other quilt in the mail yesterday, so I will be starting that next week. It will be machine quilted, so I'll do another post about setting up and doing that.
Quilt Step One: Planning
Quilt Step Two: Cutting Fabric, Preparing Machine
Quilt Step Three: Piecing The Quilt
Quilt: Piecing, Continued
Quilt: More Piecing
Quilt: Scrap Happy Blocks Pieced
Quilt: Spindrift Pieced
Quilt Step Four: Sashing
Quilt Step Five: Border
Quilt: Choosing Batting
Quilt Step Six: The Quilt Sandwich
Quilt Step Seven: Hand Quilting
Now that I have my quilt sandwich assembled, it's time for me to quilt this (seemingly bigger each day) quilt. This is only the second time I've hand quilted anything, but it's already much easier this time around and I can tell my stitches are getting a lot better.
The first thing I had to do was decide what pattern I wanted to quilt. I wanted to keep it simple and relatively sparse both so it would go quickly and so I could avoid as many seam allowances as possible (it's a lot harder to quilt wherever there's a seam allowance because you have extra thicknesses of fabric). For the quilt batting I'm using, the packaging informs me that the ideal quilting distance is 2-4 inches apart, so I thought about what I wanted to do and then made sure that design wouldn't be too spaced out.
I also needed to get all of my stuff together. I use Gutermann quilting thread for hand quilting, and quilting needles (also called "betweens"). I keep scissors close by along with a thimble (though I don't use it the whole time...they drive me crazy) and one of those rubber grips used to help open jars to help me grip the needle if I need to pull it through a thicker section. The last thing I have on hand is some sort of tape that won't leave sticky residue on the fabric.
Then, it was time to quilt. As always, start in the center and work your way out. Here is my center square with the hoop already on the quilt (making sure the backing fabric didn't have wrinkles in it). The pink threads you see are the basting lines I put in to hold everything together temporarily (I will just cut those out when I'm done quilting), the white threads are my quilting lines. I chose white because it matches both the top and the bottom of the quilt. My technique's not quite good enough to make the quilting part of the quilt design yet--I just want it to blend in.
 One thing about quilting that was always a mystery to me was how to do the quilting without have all of the thread knots hanging out. My sister-in-law explained it to me in an email and with my mom's help, I finally figured out the technique. You start out by tying the knot in the end of your thread.
  Then you put the needle only through the top layer of the quilt just a short distance away from where you want to start and push the end of the needle up through the place you really want to start.
  Pull the thread until the knot pulls through the first hole, but not the second one.
 Now you're ready for the quilting stitches. Hold the needle in your dominant hand with your other hand under the quilt. With the needle vertical, push it through all layers of fabric until you barely feel the point on the bottom side
 then rock the needle over horizontal to the fabric and push it through.
 Most people use a thimble on the finger that they use to push the needle. Thimbles drive me batty though, so I only use one if I'm pushing through a seam allowance (which is hard to do). Otherwise, I tend to just push the needle with my fingernail. This wouldn't work if I was quilting for hours at time (it would get to be too much stress on my nail and start to hurt), but I like frequent breaks anyway, so it usually works fine.
Pull the thread through and voila! (random pet-peeve of mine..."wah-la" is not a word) your first quilting stitch.
 I still do my stitches separately, but you can keep up this process (when you rock the needle to the side, turn it back vertical as soon as the point comes through the top and do another stitch) so you get several done at once. You'll also notice my oh so lovely princess tape. I think I've briefly mentioned this trick that I saw my sister-in-law using, it just gives you a guide for making a straight line of stitches. Medical tapes work well because they don't leave the fabric sticky. The last time we bought tape was to bandage up a crushed finger injury of Sierra's (note to all the kiddies out there...sticking your fingers in the hinge side of an open door is a BAD idea), so what I have is princess themed.
At the end of your line of stitches (or the end of your thread, whichever comes first), you will also need to hide an ending knot. Make sure you stop when there's still enough thread left to tie it off. Wrap your thread around the needle
 then pull the needle through to make a knot.
 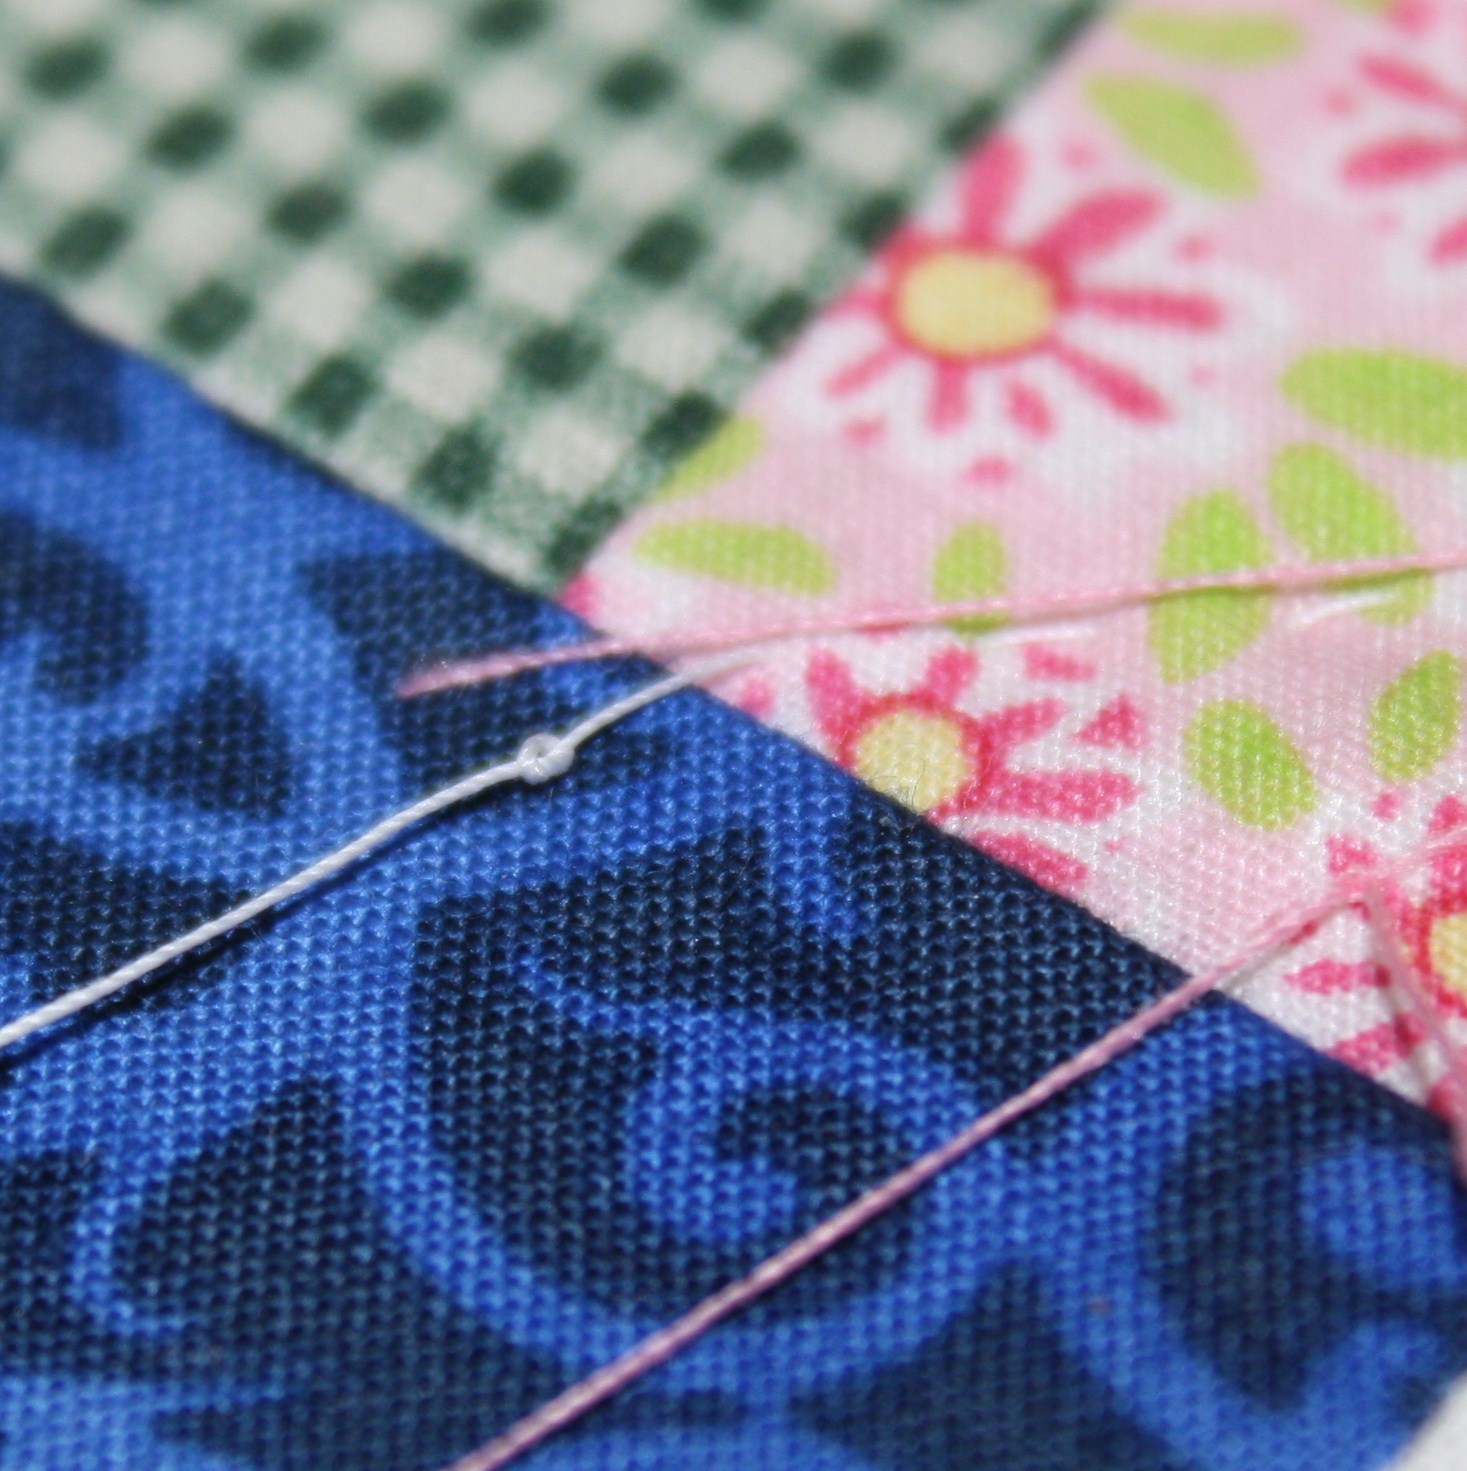 Just like when you started, stick the needle through the top part of the quilt only and push the point back up a short distance from where you're stopping.
  Pull until your knot is pulled through the fabric
 then cut off the thread close to the fabric.
The design I ended up choosing (actually, Josh came up with it because I was having trouble coming up with something I was happy with) looks like this on all of the white sashing strips
 plus I'm doing an "x" in all of the center squares. Right now I have 4 squares done, only 109 to go...yay.
I also got the batting for the other quilt in the mail yesterday, so I will be starting that next week. It will be machine quilted, so I'll do another post about setting up and doing that.
Quilt Step One: Planning
Quilt Step Two: Cutting Fabric, Preparing Machine
Quilt Step Three: Piecing The Quilt
Quilt: Piecing, Continued
Quilt: More Piecing
Quilt: Scrap Happy Blocks Pieced
Quilt: Spindrift Pieced
Quilt Step Four: Sashing
Quilt Step Five: Border
Quilt: Choosing Batting
Quilt Step Six: The Quilt Sandwich
Quilt Step Seven: Hand Quilting
Friday, August 20, 2010
THE Day
I am 25 weeks 6 days pregnant today. It's a big mental-hurdle day for me. It was this day in Sierra's pregnancy that I went into labor for the first time (no, she was not born that early).
Fun fact of pregnancy they don't tell you ahead of time...you have a mucus plug (it's just what it sounds like) stopping up your cervix during pregnancy and as you dilate, you lose this plug in pieces or one big chunk. Sometimes you even lose parts of it and your body fills it right back in. I was at work one Friday when it became necessary for me to call my OB's office and inform them that I was 26 weeks pregnant and had lost my mucus plug. They gave me the typical "there, there, crazy first time ignorant mommy" talk and told me to sit down for a while and call back if I had more than 6 contractions in an hour. I sat at my desk and put my feet up and one of my student workers asked what was up and I remember calmly telling him I thought I was in labor. He said that wasn't good and I said, "no, not really." I started keeping track of contractions, which were all between 5 and 10 minutes apart, so I call the OB's office back and basically said, "no, really...something's not right". They told me to go ahead and go to the hospital.
The hospital triaged me in the ER (that's just how you get admitted there) and called for an L&D nurse to come get me. She gave me the same "there, there, crazy first time ignorant mommy" talk on our way up to L&D. They put me in a delivery room, told me to change, and then hooked me up to the monitors. It didn't take long at all before all hell broke loose. The machines told them what crazy first time mommy had been trying to say, except by now the contractions were down to 2 minutes apart. I had never been in a hospital before at all and I suddenly found myself in bed hooked to monitors with one nurse putting in my first ever IV and another shooting terbutaline into my opposite arm. My doctor suddenly appeared and confirmed that I was dilating and effacing, which was the piece of information that meant I really was truly in labor. The IV nurse left and came back with big ol' syringe of betamethasone to stab into my back side (that stuff hurts!). A while later the contractions stopped and I asked if I could go home. Ha ha crazy first time ignorant mommy...you've earned yourself 3 days in L&D for this little stunt! Oh, and strict bedrest at home for the duration of the pregnancy, kiss the job goodbye. See these little pills that make your heart rate and breathing race? Take one every 4 hours around the clock. The good news is Sierra stayed put. I stayed in bed for 6 weeks until the terbutaline stopped working, then I found myself back on L&D...I had earned another series of betamethasone and 36 hours on a mag sulfate drip (worst. drug. ever. I have an inkling of what it's like to be comatose but completely aware of your surroundings now). It all sucked royally. We were extremely fortunate that she wasn't actually born until I was taken off the drugs at 36 weeks (and got yet another round of betamethasone to mature her lungs).
We made different prevention and treatment choices for the next pregnancy and for this one as well. I can't tell you for sure if those choices are the cause of better outcomes of it's just dumb luck, but I haven't found myself in labor quite so early again. 25 weeks and 6 days is always important to me though....getting here without complications lets me breathe a sigh of relief and every extra day almost seems like a bonus.
Monday, August 16, 2010
Quilt Step Six: The Quilt Sandwich
Disclaimer: I am in no way a quilting expert. I have learned solely from trial and error (emphasis on error) and reading on the internet. I have only made 4 quilt tops and have hand quilted 1 top and machine quilted 4 tops. I am not saying everything I do is the right way to do it, just sharing what I've picked up so far. You'll probably learn best by trial and error too ;-)
I finally decided to hand quilt the Scrap Happy quilt. I will probably be cussing myself over this decision in the near future, but I did have sound reasoning: First of all, I only have the pieces to do up to a queen sized quilt on my machine. I can move up to a king-size, but it would probably cost me about $30 to get bigger pieces for the frame. If I were going to be making more quilts, that would be reasonable, but I don't expect to be making a whole lot of king quilts. Second, I don't have a long-arm quilting machine, I just have a nifty frame that allows me to quilt easily on my regular machine. One drawback to it is that as you go along (and more material is rolled up on the bars....you'll see that with the other quilt as I machine quilt it), you have a smaller and smaller area to quilt at one time. The end result is that the only feasible quilting pattern that I can do with my set-up that won't look totally ridiculous on this quilt is a random meandering pattern done with invisible thread, which I wasn't thrilled about for this pattern. Third, I need to practice my hand quilting anyway.
The first step to quilting is to come up with a backing. Because this quilt is so big, I would need just over 8 yards of fabric to make a back. That gets expensive. Lucky me, my grandmother gifted me several sets of sheets a little while ago. They are perfectly fine and were still in the package, but they are many decades old and apparently mattresses are thicker now, so the sheets don't really fit well. We had been using them on the girl's bed, but we have other sheets that work better. So I picked out a set that I think compliments this quilt pretty well and decided to use that as my backing fabric. It's free! It's scrappy! It's perfect for Scrap Happy! Now, ideally, I would have put the seam of the back down the center of the quilt (or patched four big squares that were centered, or something else along those lines). Frankly, I'm getting big and pregnant and lazy and the only centered option I could come up with was to lay my flat sheet diagonally and then cut up the fitted sheet to fill in the four corners, then make sure it was all centered. Blah, to say the least. And I risked messing up and having to start all over again in my quest for cheap fabric. So I opted to do a totally not centered seam. Slightly tacky? yes. County fair worthy? no. But it'll keep us just as warm in the winter, so I went with the easy option.
So without further ado, here is a picture of the sheets I'm using:
I ripped out the seam that made a wider border at the top of the sheet so that I had a little more fabric to work with, and I cut the elastic and corners out of the fitted sheet. Then I laid out quilt top to see how big I needed the backing to be (your backing should be bigger than your top), and sewed the flat sheet and fitted sheet together and pressed the seam open.
With that done, I cleaned a section of the floor really well and laid out my backing wrong side up:
I smoothed it out as best I could and taped the corners to the floor (without stretching the fabric). I put on a pair of clean socks when I needed to walk on it to minimize the dirt I tracked in.
Next, I laid out the quilt batting and again, smoothed it as best I could and taped the corners down:
And lastly, it was time to lay the quilt top down, right side up. Again, more smoothing (no tape this time though):
With all my layers sandwiched together, I walked the edge of the quilt and made sure the backing and batting were bigger than the top all the way around (these get "pulled in" as you quilt).
Then it was time to baste. You need to baste your layers together so you can move the quilt around and keep everything together. Some people use large safety pins for this, but I'm sure I'd stab myself numerous times doing that, so I stick with sewing. This was by far the biggest quilt I've ever sandwiched together, so I was doing a "fly by the seat of my pants" type thing, but what I ended up doing was finding the middle of the quilt (always start with the middle) and safety pinning that, then working my way out from the center, smoothing the fabric as I went, and pinning the middle of each edge and the corners.
With everything temporarily held together, I picked a thread color I could see easily (a bright pink in this case) and sewed basting stitches that started from the center and went out to each edge horizontally, vertically and diagonally. Then I basted all around the outside edge. To make it go a little faster, I left my thread attached to the spool while I was sewing each line (so I didn't have to keep starting new pieces or dealing with LONG threads).
Once all the basting was done, I took out the safety pins and trimmed up the extra fabric a bit:
Here is an up close shot of one of the corners with the basting in:
I went ahead and put my hoop on (again, a frame would be easier, but I don't have one without spending that $30 that I don't want to spend) and folded up the quilt to put away. I will start quilting it tomorrow and will take pictures as I go, so a post on that is coming up in the next few days. (along with a post about all those frame looking things in the living room...that's Josh's "man-nesting" project, the bunk bed he's building the girls)
Quilt Step One: Planning
Quilt Step Two: Cutting Fabric, Preparing Machine
Quilt Step Three: Piecing The Quilt
Quilt: Piecing, Continued
Quilt: More Piecing
Quilt: Scrap Happy Blocks Pieced
Quilt: Spindrift Pieced
Quilt Step Four: Sashing
Quilt Step Five: Border
Quilt: Choosing Batting
Quilt Step Six: The Quilt Sandwich
I finally decided to hand quilt the Scrap Happy quilt. I will probably be cussing myself over this decision in the near future, but I did have sound reasoning: First of all, I only have the pieces to do up to a queen sized quilt on my machine. I can move up to a king-size, but it would probably cost me about $30 to get bigger pieces for the frame. If I were going to be making more quilts, that would be reasonable, but I don't expect to be making a whole lot of king quilts. Second, I don't have a long-arm quilting machine, I just have a nifty frame that allows me to quilt easily on my regular machine. One drawback to it is that as you go along (and more material is rolled up on the bars....you'll see that with the other quilt as I machine quilt it), you have a smaller and smaller area to quilt at one time. The end result is that the only feasible quilting pattern that I can do with my set-up that won't look totally ridiculous on this quilt is a random meandering pattern done with invisible thread, which I wasn't thrilled about for this pattern. Third, I need to practice my hand quilting anyway.
The first step to quilting is to come up with a backing. Because this quilt is so big, I would need just over 8 yards of fabric to make a back. That gets expensive. Lucky me, my grandmother gifted me several sets of sheets a little while ago. They are perfectly fine and were still in the package, but they are many decades old and apparently mattresses are thicker now, so the sheets don't really fit well. We had been using them on the girl's bed, but we have other sheets that work better. So I picked out a set that I think compliments this quilt pretty well and decided to use that as my backing fabric. It's free! It's scrappy! It's perfect for Scrap Happy! Now, ideally, I would have put the seam of the back down the center of the quilt (or patched four big squares that were centered, or something else along those lines). Frankly, I'm getting big and pregnant and lazy and the only centered option I could come up with was to lay my flat sheet diagonally and then cut up the fitted sheet to fill in the four corners, then make sure it was all centered. Blah, to say the least. And I risked messing up and having to start all over again in my quest for cheap fabric. So I opted to do a totally not centered seam. Slightly tacky? yes. County fair worthy? no. But it'll keep us just as warm in the winter, so I went with the easy option.
So without further ado, here is a picture of the sheets I'm using:

I ripped out the seam that made a wider border at the top of the sheet so that I had a little more fabric to work with, and I cut the elastic and corners out of the fitted sheet. Then I laid out quilt top to see how big I needed the backing to be (your backing should be bigger than your top), and sewed the flat sheet and fitted sheet together and pressed the seam open.
With that done, I cleaned a section of the floor really well and laid out my backing wrong side up:

I smoothed it out as best I could and taped the corners to the floor (without stretching the fabric). I put on a pair of clean socks when I needed to walk on it to minimize the dirt I tracked in.
Next, I laid out the quilt batting and again, smoothed it as best I could and taped the corners down:

And lastly, it was time to lay the quilt top down, right side up. Again, more smoothing (no tape this time though):

With all my layers sandwiched together, I walked the edge of the quilt and made sure the backing and batting were bigger than the top all the way around (these get "pulled in" as you quilt).
Then it was time to baste. You need to baste your layers together so you can move the quilt around and keep everything together. Some people use large safety pins for this, but I'm sure I'd stab myself numerous times doing that, so I stick with sewing. This was by far the biggest quilt I've ever sandwiched together, so I was doing a "fly by the seat of my pants" type thing, but what I ended up doing was finding the middle of the quilt (always start with the middle) and safety pinning that, then working my way out from the center, smoothing the fabric as I went, and pinning the middle of each edge and the corners.
With everything temporarily held together, I picked a thread color I could see easily (a bright pink in this case) and sewed basting stitches that started from the center and went out to each edge horizontally, vertically and diagonally. Then I basted all around the outside edge. To make it go a little faster, I left my thread attached to the spool while I was sewing each line (so I didn't have to keep starting new pieces or dealing with LONG threads).
Once all the basting was done, I took out the safety pins and trimmed up the extra fabric a bit:

Here is an up close shot of one of the corners with the basting in:

I went ahead and put my hoop on (again, a frame would be easier, but I don't have one without spending that $30 that I don't want to spend) and folded up the quilt to put away. I will start quilting it tomorrow and will take pictures as I go, so a post on that is coming up in the next few days. (along with a post about all those frame looking things in the living room...that's Josh's "man-nesting" project, the bunk bed he's building the girls)
Quilt Step One: Planning
Quilt Step Two: Cutting Fabric, Preparing Machine
Quilt Step Three: Piecing The Quilt
Quilt: Piecing, Continued
Quilt: More Piecing
Quilt: Scrap Happy Blocks Pieced
Quilt: Spindrift Pieced
Quilt Step Four: Sashing
Quilt Step Five: Border
Quilt: Choosing Batting
Quilt Step Six: The Quilt Sandwich
Student Photo Week
It's student photo week on the Not-Back-To-School Blog Hop, so step right up and meet our students!Sierra's my precocious 5 year old. She definitely keeps us on our toes! She has an early October birthday and was quite far ahead, so we decided to make last year her Kindergarten year. She was at a Montessori school in our old town for that and did amazingly well. So this year, she considers herself a first grader. She is currently doing a mix of first and second grade work, and based on the pace she's going at, I'm thinking she will be on all second grade with a little third grade work thrown in by the end of the year. Her favorite subject right now is geography and she excels at reading, while needing a little more guidance and TLC when it comes to math.
 She's been helping daddy build a new bed for the girls this weekend
Sedona's my playful 3 year old. She wants to do whatever big sister is doing, but just doesn't have the patience to sit still at all yet. She's interested in books, but seems much more naturally talented at numbers. I work with her on her speech therapy exercises and phonics (the two go together quite well) and when she's given a choice, she gravitates towards "money" (counting coins) and "writing" (tracing lines and letters).
 Sedona shucking corn. Takes her a while, but she does a really good job!
And this little girl already has a pretty big impact on our day (I'm not a morning person anyway and pregnancy doesn't help). We expect she'll be joining us sometime between Halloween and Thanksgiving (her sisters were a little early, so we won't be surprised if she is too). I'm just hoping that newborn "bump on a log" stage will last long enough to get me through this year and then I'll worry about how I'm going to incorporate a really young child into our homeschool set up!!

Sunday, August 15, 2010
Marshmallows for Breakfast
Our children don't understand the concept of a weekend. They also see no reason to "waste" a perfectly good morning by sleeping in. Fortunately, Sierra is getting older, more independent, and more capable of taking care of herself. So when two WAY too awake children came running into our room this morning, we hit the parent's version of the snooze button and told Sierra to make them both a bowl of cereal and leave us alone.
Then I heard this conversation from the kitchen...
Sedona: "Sister! We could have lucky charms!"
Sierra: "Hey! That's a GREAT idea!"
Sedona: "Hoo-ray!!!!" (followed by the sound of shuffling feet that goes along with her "hooray dance")
Then I heard this conversation from the kitchen...
Sedona: "Sister! We could have lucky charms!"
Sierra: "Hey! That's a GREAT idea!"
Sedona: "Hoo-ray!!!!" (followed by the sound of shuffling feet that goes along with her "hooray dance")
Saturday, August 14, 2010
Quilt: Scrap Happy Pieced!
I finished piecing the scrap happy quilt!!! There is no additional border on this one, so it's ready to quilt now (as soon as I decide what I'm doing for the back). You don't really appreciate how big a king-size quilt is until you're doing that last bit of sewing and ironing that joins everything together!
Here is the whole quilt:
And here is another close-up of what the individual squares look like:
Edited to Add: If you got here from the We Did It! or Quilt Story Linky, Welcome! I have been doing a series of posts since February so everyone could follow along as I made 2 quilts. The other quilt top along with links to each step of the process can be found here. I've got my backing fabric figured out and will be posting by the end of the week about setting up for the actual quilting part. Enjoy!


Here is the whole quilt:

And here is another close-up of what the individual squares look like:

Edited to Add: If you got here from the We Did It! or Quilt Story Linky, Welcome! I have been doing a series of posts since February so everyone could follow along as I made 2 quilts. The other quilt top along with links to each step of the process can be found here. I've got my backing fabric figured out and will be posting by the end of the week about setting up for the actual quilting part. Enjoy!
Thursday, August 12, 2010
Another baby update
Did all of my 24 week check things this week and baby #3 appears to be baking nicely. I am gaining a little over a pound a week now, which has finally put me over pre-pregnancy weight. My blood pressure is quite good---still at my non-pregnant norm of around 110/60. Not spilling protein or glucose in my urine and no UTIs. Did my blood sugar check and it was 82 right before a meal and 116 one hour after a meal, which is just fine and dandy as well. Still measuring right on track for 24 weeks. The contractions continue to be much less of an issue so far in this pregnancy than they were in previous ones and I'm not dilating yet. I'm still thinking that's just from eliminating the stress of co-workers and office politics. I am having some really icky reflux issues lately, which pretty much sucks, but not nearly as much as being so sick in the beginning sucked. I have a feeling I'm going to see a return of...well, "returned" food here soon, so I'm just still focusing on weight gain.
Baby is much stronger than I remember the girls being. A lot of times her kicks hurt and we think she's training to be a kung fu champion. We may have zeroed in on a middle name as well. It's quite old fashioned, but meets all of our criteria and goes with the first name that we like.
Baby is much stronger than I remember the girls being. A lot of times her kicks hurt and we think she's training to be a kung fu champion. We may have zeroed in on a middle name as well. It's quite old fashioned, but meets all of our criteria and goes with the first name that we like.
Wednesday, August 11, 2010
On open letter
One of my email accounts has been open for about 10 years now and I use it anytime I need to fill out an online form for anything. Accordingly, it's starting to get rather bogged down with ads, sales notices and spam. Some of it I'm happy to have and some of it is big time over kill. I have a few responses to throw out there:
- Sub-Zero and Wolf: While a room full of your appliances WOULD be my dream kitchen (seriously, I think I just drooled on my keyboard), $2500 in instant savings still doesn't put me anywhere close to any kitchen remodeling budget I'll have anytime soon.
- Land's End: I like your company, I like your products. I buy from you. However, I've been getting at least one email a day from you. It's overkill and I no longer pay attention to them (which is not in your best interest...with fewer emails, I'd be more likely to notice a new sale and actually buy something). What really creeps me out though is your emails are the ONLY ones I cannot delete in bulk. With emails from anyone else, I search for just those emails and easily delete them 25 at a time. When I try to do the same with your emails, my account freezes up. Every time. I don't know why this happens, but it's freaky. Hey, I just realized I can specify to only get one email a week from you. Would've been nice to know that without clicking the "unsubscribe" link
- Petsmart: I also buy from you on a regular basis. I don't need 20 emails telling me I can win a dog-friendly Honda element. I don't need dog-friendly at this stage of my life, I need 3 carseat and all associated kid gear friendly (which the Element is not). With the first email, I thought, "oh, that's cool" and hit delete, but now you're getting on my nerves.
- Disney Cruise Lines: Yes, like Sub-Zero and Wolf, you have also tapped into my dreams. A trip with you would be a dream vacation. Unfortunately, while the planning DVD is free, the cruise is not. A big fat sale would do me more good.
- And last, but most certainly NOT least: To the moderator of a certain email group who explained an additional moderator was needed and the job was easy, "just keep the spam off the list"...DUDE--YOU are the source of quite a bit of spam on the list. If it was forwarded to you and doesn't relate to the topic of the group at all, IT'S SPAM! Your emails (and the group's apparent acceptance of/agreement with them) is the main reason I've shied away from taking the time to meet any of you.
Tuesday, August 10, 2010
Quilt: Choosing Batting
Disclaimer: I am in no way a quilting expert. I have learned solely from trial and error (emphasis on error) and reading on the internet. I have only made 4 quilt tops and have hand quilted 1 top and machine quilted 4 tops. I am not saying everything I do is the right way to do it, just sharing what I've picked up so far. You'll probably learn best by trial and error too ;-)
Believe it or not, there is no fabric or craft store where we live now. Rather than drive an hour (one-way) to get to one, I got online yesterday to order batting for the quilt I had finished (I had already picked up king-size batting for the other one when there was a good sale going on several months ago). That reminded me that shopping for batting the first time is overwhelming and it'd be worth doing a post about.
Batting is the middle of the quilt--the part that makes it fluffy and warm. There are a lot of different materials you can choose to use for batting. In the old days, it was old blankets that went in the middle of a new quilt. Today if you are wanting to save money and have fabric laying around, you might use flannel or even fleece. You can buy batting made out of wool, silk and bamboo (no, the bamboo isn't prickly--Josh and I have bamboo sheets that are our absolute favorite because they're so soft). Practically speaking though, most people are making a choice between polyester and cotton batting, so I'm just going to do a quick run down of those two.
Polyester batting has the fibers bonded together with a glue-type substance. It looks fluffier in the package and will "poof" more in your quilt to give a look similar to a store-bought comforter. It's easier to hand quilt, but also works with machine quilting. It is more likely to "beard" (fibers pulling through the needle holes where you quilted) as time goes on though and is not quite as warm in winter or comfortable in the spring/fall.
Cotton batting has the fibers bonded together by "needle punching" instead of glue. Though it's thinner, it will be warmer in the quilt and because of the natural fibers, it will also be more comfortable in warmer weather. The batting will shrink when the quilt is first washed, leading to that antique, puckered appearance on the quilt (which some people like and some don't). You may be able to pre-wash the batting to shrink it before quilting, but I've personally never done this. Cotton batting is fine for machine quilting and experienced hand quilters, but can be difficult to hand quilt because it's more dense. Cotton batting is also more expensive.
You will also need to decide if you're going to buy packaged batting in typical bed sizes or batting by the yard. So far, I've always purchased mine pre-packaged and cut, but I'm beginning to consider buying a whole bolt of batting next time I see a good sale. Whichever you do, be sure that your batting is a little bigger than your quilt top. As you quilt, the batting and backing will get "pulled in" a bit, so they need to be a couple inches bigger than the top you're quilting. The pre-packaged battings take this into account.
So far, I've chosen to use either 100% cotton or 80/20 cotton/polyester blend battings. I haven't had any trouble machine quilting either and even with very very limited experience, I didn't have trouble hand quilting the blend.
Quilt Step One: Planning
Quilt Step Two: Cutting Fabric, Preparing Machine
Quilt Step Three: Piecing The Quilt
Quilt: Piecing, Continued
Quilt: More Piecing
Quilt: Scrap Happy Blocks Pieced
Quilt: Spindrift Pieced
Quilt Step Four: Sashing
Quilt Step Five: Border
Quilt: Choosing Batting
Quilt Step Six: The Quilt Sandwich
Sunday, August 8, 2010
School Room Week
This week's topic on the Not-Back-To-School Blog Hop is School Rooms. As I've mentioned before, I originally planned on doing school at the kitchen table. When we got to this house (which we had rented sight-unseen) though, I immediately thought the little loft room upstairs would be perfect for school. So far, the only problem with that has been that we chose to start school "early" and we don't have an A/C. Even in Montana, the upstairs of a house gets mighty hot in August when there's no A/C. So the temperatures have dictated that our seat work take place in the morning before it warms up. Here are some pictures of how I've set the room up:  We have two desks we got from my parents...my old desk I always used and an actual school desk (which the kids think is the neatest thing ever). The built-in cabinet is great for holding the things the kids aren't allowed to get into without asking. The bottom shelf has a big stack of paper and notebooks and my pens/highlighters/post-its. The middle shelf holds the workbooks, and the top shelf has the more bulky things like math manipulatives. The US map on the wall is down at their height and I've marked each state that they've been to. Whenever we're planning a trip, I have them find the place on the map. We also often review where in the country each of our relatives live.
 From the other corner of the room, you can see the bigger desk and the shelves they ARE allowed to get into. There's a globe to look up countries and time zones, a jar of various coins for practicing money values or just counting, one shelf of books my 3 year old can keep herself entertained with, and several small boxes (one for crayons, one for markers, one for colored pencils, one for pencils/pens). I have the calendar up because my oldest was having trouble understanding days of the week, but now she's got it down and just gets a kick out of being able to see everything clearly and changing the signs saying what the current weather is. The easel is just for them to draw or paint, or to keep my younger one happy while we're busy.
 This picture is from standing by the calendar. There are more shelves here that are "my" things again (some boxes with extra scissors and glue, blank paper, etc...). Our printer/scanner/copier is on top (it's wireless, which is helpful when I'm on the computer downstairs and find something I want to print). The little table is set up with all of their play-doh. Again, this helps keep the 3 year old happy when we're working. Since we are renting and I didn't want to risk messing up the carpet, I put an old rug we don't care about in the room. It's big enough to take the brunt of any play-doh or paint that falls and I plan to throw it away when we move.
 That's it for the room, but this last picture just shows something that's been invaluable for me. I've decided to copy pages from workbooks instead of writing in them and buying new each year. I bought a one-inch binder and started out by copying about 5 weeks worth of worksheets and separating them by subject in the binder. Whenever both kids happen to be working independently, I'll quickly copy a week or two from one workbook and add it to the binder, so I always have what I need already printed out and no one's having to wait, nor am I up late the night before copying things.
 You might notice there aren't many books. Because our stairs aren't exactly kid-safe, they aren't allowed upstairs alone. Since I want them to have access to a lot of books all the time, all of the kid books live downstairs. There are plenty of things my 5 year old can easily read independently, plus some more challenging books that she can get through if she takes her time, and some non-fiction things that I hope will grab her attention soon just by being there. Also plenty of books my 3 year old can flip through and "read" as well as the regular pre-K books that we read to her.
There are plenty of other "school rooms" we use too: we've been visiting a lot of National Parks this summer, sometimes we will sit at the kitchen table during the younger child's naptime (in the afternoon, when it's hot) to work on those subjects where my daughter needs more help, and I've decided to utilize my younger daughter's speech therapy time as school time too (I pack up the worksheets my oldest would normally do independently in a vinyl folder along with a pencil and she sits at the kid's size table in the therapist's room to work while I pay attention to what's going on with the therapy). Using that therapy time has been really great because we are going several days a week and it keeps my oldest occupied so she's not interfering, and also gives her time to get her work done on a day when she would be rushed to finish it at home.
And one last note: obviously they both picked their own outfits that you see in these pictures. I put a few limits on what gets worn outside the house, but they get free reign at home--sometimes the results are....well, interesting.
Quilt Step Five: Border
Disclaimer: I am in no way a quilting expert. I have learned solely from trial and error (emphasis on error) and reading on the internet. I have only made 4 quilt tops and have hand quilted 1 top and machine quilted 4 tops. I am not saying everything I do is the right way to do it, just sharing what I've picked up so far. You'll probably learn best by trial and error too ;-)
I finished up the top for the Spin Drift quilt! Only 3 months later than I was hoping for, but hey, it's still before winter time.
Today I finished up the borders. I was wanting to do mitered corners on the borders, but in keeping with the idea of using scraps and saving money, I ended up using fabric that I had just enough of, and there wasn't enough to do a miter. So these are just regular ol' borders.
First, I cut my fabric (a bunch of long, narrow strips) and sewed all the short ends together so that I had one skinny, long piece: Then, I cut that piece into 4 pieces that would fit the sides of the quilt. If you're following a pattern, it will give you the measurements you need here. If not, you'll need 2 pieces that are the same (or very slightly longer for fudge factor) length as the sides of your quilt and 2 pieces that are the same length as the top and bottom of your quilt plus the width of your border times 2
Then, starting with the sides, mark the center of your border piece and the center of your quilt side: Match up these two points, lay the right sides of the fabric together (I always lay the quilt out on my bed at this point) and pin the center of the border to the center of the quilt. A couple of notes here: First, as I've stated before, I HATE pinning. Borders are not the time to avoid pins. Use pins and use a LOT of them. It's a minimal time investment to save you a huge headache. Second, I used to pin things with my pins parallel to the seam until I saw an episode on HGTV that showed someone sewing with the pins perpendicular. I wondered why it was done that way and looked it up...with the pins perpendicular (as I have them in the above picture), you can sew right over them and pull them out later. It minimizes bunching on the fabric, makes it easier as you're sewing, and you prick your fingers less too.
Once the center is pinned together, work your way from the center out to the edges and pin your border to the quilt (again, LOTS of pins). The border is going to help square up your quilt, so you want the border straight, not necessarily following every edge of your quilt. Hopefully you've been careful throughout the piecing and the small errors are still within a reasonable seam allowance. If there are some bigger mistakes, you may need to square up the quilt by doing some cutting before putting the border on.
Sew the border on both sides of the quilt, press the seams, then sew the border on the top and bottom of the quilt and press the seams:
 This particular quilt had two borders, so I repeated the whole process all over again for the second one and here is the finished quilt top:
  Sorry the picture's not any better--the best hanging situation I could come up with didn't leave me much room to back up for a picture plus I had to stand on the bed to take the picture (which my midwife would probably not approve of in the first place), so this is what I ended up with. I think you can definitely get the idea though. The borders are really a big part of this quilt. They calm down the craziness of all those pinwheels and the first one sort of blends, while the second one really frames it. I would like to be able to use that same rose fabric for my binding, but I don't think I have enough left, so I will probably have to come up with something else. This quilt will be for the girl's room though and they have both been coming up to me all day saying how pretty it is, so I guess it's a winner!
It will probably be another week or two before I write up the post detailing the actual quilting and then the binding, but here is the fabric I plan to use for the back: Again, not entirely my first choice, but we're going with what I have laying around. This was gifted to me and I won't use it for anything else, so I'd like to make it work for this. There is just barely enough for it to work--I'll have to be very careful not to waste any of it and even then it may not work out, but I'm sure gonna try!
Quilt Step One: Planning
Quilt Step Two: Cutting Fabric, Preparing Machine
Quilt Step Three: Piecing The Quilt
Quilt: Piecing, Continued
Quilt: More Piecing
Quilt: Scrap Happy Blocks Pieced
Quilt: Spindrift Pieced
Quilt Step Four: Sashing
Quilt Step Five: Border
Quilt: Choosing Batting
Quilt Step Six: The Quilt Sandwich
I finished up the top for the Spin Drift quilt! Only 3 months later than I was hoping for, but hey, it's still before winter time.
Today I finished up the borders. I was wanting to do mitered corners on the borders, but in keeping with the idea of using scraps and saving money, I ended up using fabric that I had just enough of, and there wasn't enough to do a miter. So these are just regular ol' borders.
First, I cut my fabric (a bunch of long, narrow strips) and sewed all the short ends together so that I had one skinny, long piece:
 Then, I cut that piece into 4 pieces that would fit the sides of the quilt. If you're following a pattern, it will give you the measurements you need here. If not, you'll need 2 pieces that are the same (or very slightly longer for fudge factor) length as the sides of your quilt and 2 pieces that are the same length as the top and bottom of your quilt plus the width of your border times 2
Then, starting with the sides, mark the center of your border piece and the center of your quilt side:
 Match up these two points, lay the right sides of the fabric together (I always lay the quilt out on my bed at this point) and pin the center of the border to the center of the quilt. A couple of notes here: First, as I've stated before, I HATE pinning. Borders are not the time to avoid pins. Use pins and use a LOT of them. It's a minimal time investment to save you a huge headache. Second, I used to pin things with my pins parallel to the seam until I saw an episode on HGTV that showed someone sewing with the pins perpendicular. I wondered why it was done that way and looked it up...with the pins perpendicular (as I have them in the above picture), you can sew right over them and pull them out later. It minimizes bunching on the fabric, makes it easier as you're sewing, and you prick your fingers less too.
 Once the center is pinned together, work your way from the center out to the edges and pin your border to the quilt (again, LOTS of pins). The border is going to help square up your quilt, so you want the border straight, not necessarily following every edge of your quilt. Hopefully you've been careful throughout the piecing and the small errors are still within a reasonable seam allowance. If there are some bigger mistakes, you may need to square up the quilt by doing some cutting before putting the border on.
Sew the border on both sides of the quilt, press the seams, then sew the border on the top and bottom of the quilt and press the seams:
 This particular quilt had two borders, so I repeated the whole process all over again for the second one and here is the finished quilt top:
  Sorry the picture's not any better--the best hanging situation I could come up with didn't leave me much room to back up for a picture plus I had to stand on the bed to take the picture (which my midwife would probably not approve of in the first place), so this is what I ended up with. I think you can definitely get the idea though. The borders are really a big part of this quilt. They calm down the craziness of all those pinwheels and the first one sort of blends, while the second one really frames it. I would like to be able to use that same rose fabric for my binding, but I don't think I have enough left, so I will probably have to come up with something else. This quilt will be for the girl's room though and they have both been coming up to me all day saying how pretty it is, so I guess it's a winner!
 It will probably be another week or two before I write up the post detailing the actual quilting and then the binding, but here is the fabric I plan to use for the back:
 Again, not entirely my first choice, but we're going with what I have laying around. This was gifted to me and I won't use it for anything else, so I'd like to make it work for this. There is just barely enough for it to work--I'll have to be very careful not to waste any of it and even then it may not work out, but I'm sure gonna try!
Quilt Step One: Planning
Quilt Step Two: Cutting Fabric, Preparing Machine
Quilt Step Three: Piecing The Quilt
Quilt: Piecing, Continued
Quilt: More Piecing
Quilt: Scrap Happy Blocks Pieced
Quilt: Spindrift Pieced
Quilt Step Four: Sashing
Quilt Step Five: Border
Quilt: Choosing Batting
Quilt Step Six: The Quilt Sandwich
Subscribe to:
Posts (Atom)