Disclaimer: I am in no way a quilting expert. I have learned solely from trial and error (emphasis on error) and reading on the internet. I have only made 4 quilt tops and have hand quilted 1 top and machine quilted 4 tops. I am not saying everything I do is the right way to do it, just sharing what I've picked up so far. You'll probably learn best by trial and error too ;-)
I'm finally ready to move past the piecing posts! Yesterday, I started the sashing on the Scrap Happy quilt. Sashing is fabric between the blocks. Because of the scrapiness (that's not a word, is it?) of this quilt and all the different colors I have going on, I wanted something very very plain for the sashing. Something that would let your eyes rest a little between each block. So I went with white fabric with small white flowers printed on it. Not too plain, but not distracting. Then for contrast, I picked black with a gray design on it for the sashing squares. The trick with sashing is that you can't just sew strips around all four sides of a block (at least, not easily). So, instead you sew a sashing strip to one side of all the blocks, then sew a sashing strip to a sashing block, and sew those in between each block. Clear as mud? Here it is in pictures:Then, when you have your rows sewn together, you have the sashing on all four sides of each block (this isn't really sewn, I still have to pick a fabric to make triangles out of and fill in the edges since these rows will be diagonal, not horizontal)
The other side of this is that I've put on my dual feed presser foot for sewing the rows together. If I had thought ahead at all, I would've used a different aperture on my camera and gotten the whole thing in focus, but that didn't happen, so this is what you get:A dual feed foot has another set of feed dogs (the part that moves your fabric along) on it, so that both the top and bottom layer of fabric are being fed by the machine. This enables my aversion to pinning (I know, an ironing AND a pinning aversion, what am I doing sewing??) by making it easier to move both pieces through at an equal pace. The dual feed can be kinda hard to get started with narrow seams (the fabric sometimes wants to skitter off to the side), so I don't feel like it's worth using on smaller pieces, but once I get to the point where I'm sewing large pieces of fabric together and trying to keep many seams lined up without stretching my fabric, it's nice to have to the dual feed foot on there. It's not a necessary thing, just something that came with the machine when I got it that makes my life a little easier.
With any luck, we'll start talking borders by next weekend.
Quilt Step One: Planning
Quilt Step Two: Cutting Fabric, Preparing Machine
Quilt Step Three: Piecing The Quilt
Quilt: Piecing, Continued
Quilt: More Piecing
Quilt: Scrap Happy Blocks Pieced
Quilt: Spindrift Pieced
Quilt Step Four: Sashing
Quilt Step Five: Border
Quilt: Choosing Batting
Quilt Step Six: The Quilt Sandwich
Tuesday, March 30, 2010
Sunday, March 28, 2010
Quilt-Last of the Piecing
Finished all the blocks for the Spindrift quilt today:
Then I laid them all out on the bed in the order that I want to sew them together:
Also washed, ironed and cut all my fabric for the sashing on the Scrap Happy quilt:
The next post (tomorrow, maybe Tuesday) will be all about sashing.
Then I laid them all out on the bed in the order that I want to sew them together:
Also washed, ironed and cut all my fabric for the sashing on the Scrap Happy quilt:
The next post (tomorrow, maybe Tuesday) will be all about sashing.
Labels:
sewing
Saturday, March 27, 2010
I'll be back!
I know, I've been kinda MIA. That's because we've been busy thinking about a piece of news that's going to slightly affect our moving plans (yes, we're still moving). I will be updating again before the weekend's over!
Monday, March 22, 2010
Scrap Happy Update
One last update on the Scrap Happy quilt piecing before I go back to a more step-by-step format.
On Saturday, we had a yucky cold front come through and it looked like this outside:So, while we were all sitting around in our PJs and staying in out of the cold and rain, it was a perfect time to sit down and finish out the Scrap Happy squares:
Now, I'm supposed to have 113 squares and somehow I managed to only end up with 110. I'm not sure if I just counted wrong somewhere (when you're cutting out over 1300 little rectangles, that could happen!) or if a certain 2 year old I know and love absconded with them, but either way, I need to cut and sew 3 more. Armed with a few squares, I headed off to the fabric store and picked out a fabric for my sashing (the fabric between squares). Just to get an idea of the overall look, I laid the sashing fabric out and laid squares on top of it.
So this is pretty much what the quilt is going to look like, only those black squares will be at the corner of every block. I like the little muted details on these fabrics:
I'm planning to pick a mostly black, with a thin white design on it for the triangles that will fill in along the edges of the quilt.
Labels:
sewing
Tuesday, March 16, 2010
Yet Another Quilt Update
Making fabulous progress on the quilts. Could finish piecing the squares this week if I buckle down and work a little each evening. Having both girls around for spring break (and Sedona diving head first into the torrential three's) is slowing me down a bit.
Scrap Happy Quilt
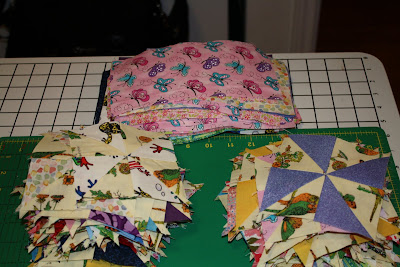
We have everything assembled so that there are three pieces to sew together to make a block. Since I took the pictures below, I have finished half of the blocks (I'm making 113 total, 56 are done). Here are all the pieces
And here's what one block put together will look like (this one isn't sewn):
So far, I've managed to use 13 different fabrics in each block. Hoping I can keep that up.
Spindrift Quilt
I finished all the pinwheels!
Everything else on this quilt will be easy, there are no more small pieces and no sashing. Here is what a block will look like when it's put together:
The next update will get back into an instructional format as I finish up squares, do sashing and borders, then quilting and binding.
Labels:
sewing
Long Term Goal Planning
I have really vacillated in the past about long term goals. My first instinct is to say that my long term goal is to own enough land and be capable of producing and preserving food well enough to provide (and barter) for most of our needs. On the other hand, I don't want to be tied to that piece of land. When my children are grown and having their own kids, I want to be able to go to them for extended periods of time if the need arises. This seems like a real conundrum to me. You can't have something like a dairy cow or goat unless you are there to milk every single day.
Then I went grocery shopping yesterday. It was a little bit eerie. The produce section had many many bins (at least 1/3) that were completely empty. The produce that was there was not really great quality. There were signs posted everywhere about weather patterns affecting supply. Despite the rest of the shelves being stocked, it pretty much freaked me out. It solidified my idea of continuing to improve garden skills and settling long term in a place where we can have extensive vegetable gardens and fruit trees. Because the thing is, if food should suddenly be in short supply, it will be too late to start from scratch. Providing for yourself is something you have to learn about ahead of time and practice on a regular basis, even if some people think you're nuts for doing so.
I've realized that where some people might feel secure with things like retirement savings, my sense of security is very much tied into having a reliable source of shelter and food/water.
P.S. More quilt updates coming later today, we've made A LOT of progress, I just haven't taken pictures yet
Labels:
food preservation,
Frugal Living,
gardening
Monday, March 15, 2010
I ♥ Faces--Bundled Up!
We recently purchased a DSLR and it's been my first chance to get my hands on a "real" camera. I found out about the I ♥ Faces photo challenges and decided it wouldn't hurt to give it a try and check out everyone else's photos so I could learn how to take and edit a great photo.
This week's theme is bundled up, and I just love this picture of Sedona. It was taken the day after we got the camera, and now I know things I might have done a little differently, but I just love those curls sticking out. This was also a HUGE snowfall for us - most years we don't see any snow at all - so it's a fun memory all around.
Labels:
photography
Sunday, March 14, 2010
I Like Sunshine
Spring
Is
Finally
Here
Yay!
(These pictures are all of our fruit trees plus one wildflower that popped up in the yard)
Is
Finally
Here
Yay!
(These pictures are all of our fruit trees plus one wildflower that popped up in the yard)
Labels:
photography
Wednesday, March 10, 2010
Quilting, X-Games style
If ever you think sewing is a boring hobby, just give it a try with a puppy at your feet that likes to randomly roll over onto your foot pedal. Oh the thrill of never knowing when your machine will suddenly kick into high gear and where your fingers will be at the time! Kinda like the thrill of knowing the toast is going to pop up any second now, but not knowing exactly when...
Tuesday, March 9, 2010
To My First Born
Today I was fixing your braids and said, "I love you". You rolled your eyes said, "I know" in a voice that told me you were embarrassed, but also let me know you appreciated the reassurance. I'm sure as you get older, it will get more embarrassing, but I promise I'll keep saying it, because I know you'll also need the reassurance even more.
You are no longer a baby, toddler or even pre-schooler. You are beginning to grow into a wonderful young lady. You have an insatiable desire to learn, you have a personality that truly makes you "somethin' else", you have wisdom beyond your years.
You are developing a sense of empathy and I am so proud of you for the hard work you've done to understand and respect other people's feelings. I appreciate that you have talked through your thoughts on these matters with me and I am incredibly impressed that at the young age of 5, you have consciously stopped yourself in the midst of an activity and thought about how you could help someone else feel better.
You totally rock a flouncy skirt. And a dance floor. You've attained the top TWO scores on Wii Fit tightrope walking and no one else in the family can beat you. You ride a "two-wheeler" with no trouble at all and run "super fast". You can hang upside down from your knees and climb a fence.
You're trying more new foods, even if you don't like them and you've attained a level of cooking skill unmatched by some college students.
You are bubbling over with life and energy. You are a caring, loving big sister and an amazing and fabulous daughter. I think you're wonderful, and I love you.
Monday, March 8, 2010
Quilt-More Piecing
I currently feel like I'm in a special quilter's version of Dante's Inferno...I've moved from the "ironing" level of purgatory into the deeper, darker, pinwheel level of purgatory. All pinwheels, all the time...bwa ha ha ha ha! This is the point where I would typically lose steam and quit working for a few months, but I've already laid bare my quilting plans on the blog, so I can't quit now. Thank you for holding me accountable, internets.
I've also realized there's an important bit of piecing knowledge that I haven't shared and feel the need to clarify: sewing is like biomagnification. What? No one else here is a science nerd? Biomagnification is the reason we worry about mercury in fish: fish A has mercury in it. Fish B is bigger and eats 5 of fish A, so it now has 5A mercury. Fish C is even bigger and eats 5 of fish B, so it now has 25A mercury. The problem keeps getting bigger (so only eat big fish in moderation). Sewing has a similar problem to biomagnification: when you make mistakes, they will be magnified later if you don't correct them. If you are supposed to sew a 1/4" seam and it's slightly less than 1/4", your next seam could be off even more and the next one off more than that. To avoid this, once you start matching up pieces, you should be aligning SEAMS (where they're involved), not edges. For instance, on my pinwheels, when I put the top half and the bottom half together, I match up the seams and often find the edges do not match (they are within the 1/4" seam allowance though--I sew 1/4" from the edge that sticks out the most). If I were to match up the edges instead, none of my corners would meet up neatly. When I get sloppy about it, I get something like this:
When I'm careful, it comes out more like this (sometimes):
I am definitely no seamstress, I have a lot to learn. Sierra and Sedona each have quilts my sister-in-law made them (they LOVE those things!) and each block is perfectly lined up, every corner meets just perfectly. I don't know how she does it. Her hand quilting is perfectly straight too...I DO know how she does that (puts a piece of tape on the quilt to give her a straight line to follow), but when I tried to duplicate it, I still couldn't make ONE stitch follow the tape, much less a whole line of them. I just need lots more practice, I suppose.
Labels:
sewing
Sunday, March 7, 2010
Another Quilt Update
Update: I hate ironing. And pinwheels. (you'll just have to click the picture to get the full effect)
Labels:
sewing
Friday, March 5, 2010
Quilt-Pinwheels Hurt My Brain
I'm not entirely sure why, maybe it's just my pure lack of visualizing ability, but it seems to take every brain cell for me to get a pinwheel put together correctly. It occurred to me that I didn't accurately depict WHY I have to lay out every block before sewing it. If you simply alternate colors, you can get all sorts of incorrect things:
Oh wait, that last one was right. SEE?! It's hard! And that's not even factoring in the mental gymnastics I go through to get seams lined up and make sure I sew the correct side of the squares and to have all the corners actually meet when it's sewn together. I've got 9 pinwheels done, another 10 halfway done and only 71 more to go. I spend more time than I should on these being sure that everything is right. Unfortunately, as I learned from my 8th grade British Lit teacher (the ever wonderful Mrs. Brown) and the Robert Burns poem, To A Mouse (which I still have mostly memorized), "The best-laid schemes o' mice an' men/Gang aft agley,/An' lea'e us nought but grief an' pain". Because sometimes, you use every last brain cell (I assure you, I have plenty) and that is STILL not enough:
Labels:
sewing
Wednesday, March 3, 2010
Pet Peeve
I was trying to think of some cutsie title for this post, but all that came to mind was "The Wednesday WTF", but even when I cleaned it up to WTH, that didn't seem quite right, and now I'm still blogging about what I wasn't going to blog about, so let's move along now.
I repeat to myself (often) "not my choices, not my choices, not my choices". I am passionate about childbirth and breastfeeding issues...I have very strong opinions about childbirth and breastfeeding choices. However, I also work with families from all different walks of life and recognize their right to make the choices that are best for their families. That doesn't mean I never come home wanting to pull my hair out over a choice someone makes though, so I started taking a deep breath and saying, "not my choices, not my choices, not my choices". It's my job to educate, not to dictate what a certain family should do, I can't make those choices for them. I've gotten fairly good at letting things go and not obsessing over what other families do.
But THEN.......some people make choices and claim that wasn't their choice. And well, that irks me (to put it mildly). Here's the thing. There is a difference between "I have to" and "I choose to". I think people might be better at distinguishing them if they also brushed up on the definitions of "Need" and "Want". It would be a lot easier for me to "live and let live" with people who have different lifestyle choices than me if they would stop complaining about their lifestyle choices. There are SOOOO many things we've convinced ourselves we NEED and therefore we HAVE to live our lives a certain way to meet those "needs". Much like you should weigh the benefits and risks of medical procedures, it's really a good idea to weigh the pros and cons of lifestyle choices and then recognize that they ARE CHOICES. And when the cons come up (because nothing is perfect), remind yourself that the pros of this choice outweigh the cons of the other choice. We make some choices because we want certain material goods. We make some choices because it makes us feel good about ourselves (those things that fall within our own moral and ethical guidelines). We make some choices because we believe it's what a good spouse, parent, child or sibling should do (back to those morals). We make some choices just because we don't like the alternative. There are LOTS of reasons to make certain choices and everyone has to make their own. But for the love of all that is good in the world, and my own sanity, please take a moment to step back and think, "do I really HAVE to? If I made another choice, what would the consequences be?" and then consciously MAKE A CHOICE. Accept that it's your choice. Snuggle down and get comfortable in your choice. Just don't complain to me about your choice, especially when it's a situation where you have the ability to change your mind and make a different choice tomorrow if your original choice is no longer working out for you.
Post Script: I used the word "choice" 28 times in this post (now 29). Weird word.
Labels:
rant
Tuesday, March 2, 2010
Quilt -Piecing, Continued
Disclaimer: I am in no way a quilting expert. I have learned solely from trial and error (emphasis on error) and reading on the internet. I have only made 4 quilt tops and have hand quilted 1 top and machine quilted 4 tops. I am not saying everything I do is the right way to do it, just sharing what I've picked up so far. You'll probably learn best by trial and error too ;-)
Scrap Happy Quilt
Sierra and I are making good progress on this quilt. We have sewn each of the 904 1.5"x3.5" rectangles into groups of two. I still have to press the seams on those. We finished sewing all of the 1.5"x2.5" rectangles into groups of two and then sewing those onto 2.5" squares. Each of these units will be the center of a block.
Spindrift Quilt
I've been working on making the 90 pinwheels I need for this quilt. Pinwheels are a bit confusing for me to keep straight, so it can be slow work. I'm not good at visualizing things, so it helps me to lay out all 4 blocks for one pinwheel to be sure I'm sewing them correctly:Then I sew the top half together and the bottom half together. I go through about 10 pinwheels at a time like this, speed piecing them. When these halves are opened, it will look like your corners don't match up. Never fear, you will be using up the bottom 1/4" in your seam allowance, they aren't supposed to match up yet:With my halves sewn, I go back and sew the top and bottom together:Voila! 1 pinwheel down, 89 to go. I have a slight pet peeve with this quilt. They have you cut 9 squares of 20 different colored fabrics: at the end of the day, that equates to 360 triangle units which will be put together in groups of 4 to make 90 pinwheels. In the pictures they show, their quilts have pinwheels where every colored triangle in one pinwheel matches. In reality, they don't have you cut enough fabric to do that. You really get 80 all matching pinwheels and the last 10 have to be put together from leftovers. It would have been better to cut 8 squares from 10 of the different fabrics (which would give you 40 pinwheels) and 10 from the other 10 fabrics (which would give you an additional 50 pinwheels, for a total of the 90 you need)
Quilt Step One: Planning
Quilt Step Two: Cutting Fabric, Preparing Machine
Quilt Step Three: Piecing The Quilt
Quilt: Piecing, Continued
Quilt: More Piecing
Quilt: Scrap Happy Blocks Pieced
Quilt: Spindrift Pieced
Quilt Step Four: Sashing
Quilt Step Five: Border
Quilt: Choosing Batting
Quilt Step Six: The Quilt Sandwich
Labels:
sewing
Subscribe to:
Posts (Atom)